
We have a newer foot scanning app:
As of Feb 10, 2026, AOMS TOT jr app has just been updated. It is created for the latest iPhone 17 compatibility request. Because of that, it has broader compatibility list compared with the AOMS TOT sr. So consider using AOMS TOT jr, instead of AOMS TOT sr, if you have newer iPhone or iPad devices.AOMS TOT jr Tutorials
First, you may want to read the AOMS TOT jr introductory and information page over here if you have not done so.
Second, the initial R&D was done with iPhone XR, so the tutorials were made based on the iPhone. The principles of these tutorials also apply to the applicable iPads that we later added (see info page ).
Third, like many other high tech products, AOMS TOT jr presents some level of complexity. The complexity has multiple elements. If we can separate these elements, we can treat the complexity one element at a time. So, let’s get started.
Tutorial #1: Basic Training of AOMS TOT jr
Setup: Use the AOMS TOT jr app installed in your iPhone or iPad to scan your hands or face. We found it is easier to scan your own face with the tutorial. For demonstrate purpose, we did not use a face for the tutorial, but you can use face for your own practice. With this tutorial, you do not need to use the mirror and the belt attachment as mentioned in the introductory page.Purpose: With the simple setup, this tutorial is designed for the user to get familiar with the app’s basic functions. The tutorial lets the user test how far the object should be put away from the iPhone or iPad and what actions need to be taken to make scans, including how to use voice commands and how to email out a single file or a pair of files. Note that timing is very important in starting, resetting, and finishing the scans and this tutorial is designed to tell you all of these. So try this tutorial multiple times until you are very comfortable with it.
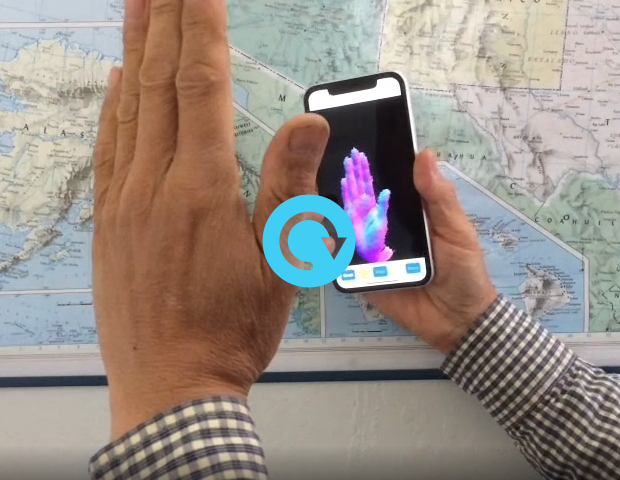
Video clip of AOMS TOT jr Tutorial #1. Click on the image to play video
You can follow the following instructions to implement the tutorial
Note: You can listen to the transcript of the text as well, just click here:
![]()
• Install the AOMS TOT jr app on your iPhone XR.
• Go to the AOMS TOT jr settings and input the email address etc. for the app.
• Launch the app and make sure the front camera is working. It can be verified by seeing live video on the iPhone screen.
• Now, let’s follow a designed training scheme with your two hands and let’s scan your left hand first. You can practice with your face too. In fact, scanning face is easier, since the object is larger than hand. But let’s do it the hard way.
• Tap the ‘Start’ button and enter the necessary information, such as patient last name, first name, left or right foot, as you did in the AOMS TOT app.
• When ‘L’ becomes orange, it is ready for the scan. The app is waiting for your command. There is a ‘time out’ period and it is about 30 seconds, so get ready in 30 seconds. What happens if the ‘time out’ period is reached? The voice command will no longer be available. If that happens, you can tap ‘Start’ again to re-activate the voice.
• Hold the iPhone with your right hand and put your left hand roughly 12 inch away from your right hand which holds the iPhone. You do this with your two hands and the iPhone in front of you. You should be able to see your left hand through the live video.
• Now you can say words like “Go”, or “Scanner”, or “Start”, or combination of them, like “Scanner Go” to activate the scanner. The screen of the live video will change to a 3D image of the scanned object on a black screen and the 3D image is ever updating based on the location and orientation of the iPhone.
• If the 3D image does not look alright, for example there are holes on the image; you move your right hand with the iPhone a little closer or a little far away from your left hand, depending on the distance, and say “Reset” or “Redo” or “Retry” or combination of them. The feedback you get from your practice will tell you whether to move closer or farther away. After reset, the scanning process will show you a new image. You can do this repeatedly, until you see the full image of your left hand.
• Move your iPhone around the left hand a little (for now). We will practice it more in future tutorials.
• Note that the initial distance is important and the scan may fail completely. If the initial distance to the left hand is way too far or way too close, the scan will fail with an error message. At that time, you can redo the scan by tapping ‘Redo’ button.
• When you want to terminate the scanning, you say “Stop”, or “Enough”, or “Finish”, or “Exit”, or “Quit”, or combination of them, the scanning will stop. If you do not terminate it by voice, the scanning will continue until the maximum number of frames is reach. This number can be set in the app settings.
• At this time, you can choose ‘Redo’ or ‘Save’ by tapping any of these buttons, depending on the image you see on screen. If you choose ‘Redo’, you will redo the above procedure. If you choose ‘Save’, the ‘L’ circle become green. It means the image is ready.
• At this stage, you can email this single image if you want to. Or, you can wait until the right hand image is ready as well.
• Now, let us try to send the single image first. So tap the green ‘L’ button and the app will ask you whether you want to send a single image alone or wait for the other image. Choose ‘Yes’ to send a single.
• At this time, the email interface comes out. Check everything. Tap ‘Send’ and you should receive an email. So check your email Inbox. At this stage, you are not able to open the 3D image yet. Later, once the lab gets the upgrade for the AOMS TOT conversion/processing program, they should be able to see the 3D image in their program.
• If you want to scan two hands and send the two images at the same time, you can choose ‘Start’ again after the left hand has been scanned. Repeat the same process as you did with your left hand and go ahead to scan your right hand.
• After both hands are scanned, verified by the two green circles, you can send both images at the same time by tapping either ‘L’ of ‘R’.
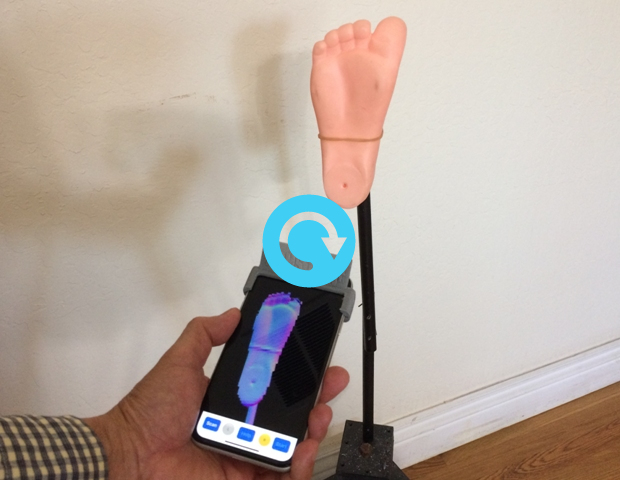
Tutorial #1B: Basic Usage of AOMS TOT jr
Setup: Use the AOMS TOT jr app installed in your iPhone or iPad, which is the same as shown in Tutorial #1.Purpose: We want to show you how to use the AOMS TOT jr without the mirror attachment. As mentioned in the info page , there is an advantage with this usage when the foot is scanned with the patient is in supine position. We hope this could be used in most cases. We recently added this tutorial because we just realized that this could be a popular usage without involving the extra mirror attachment.
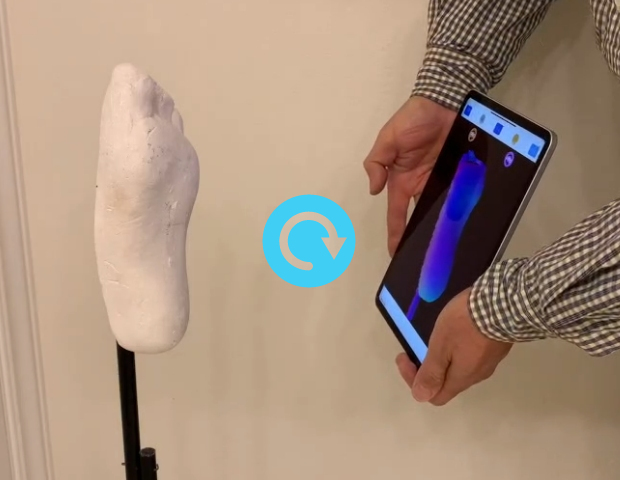
Video clip of AOMS TOT jr Tutorial #1B. Click on the image to play video
Notes on Tutorial #1B:
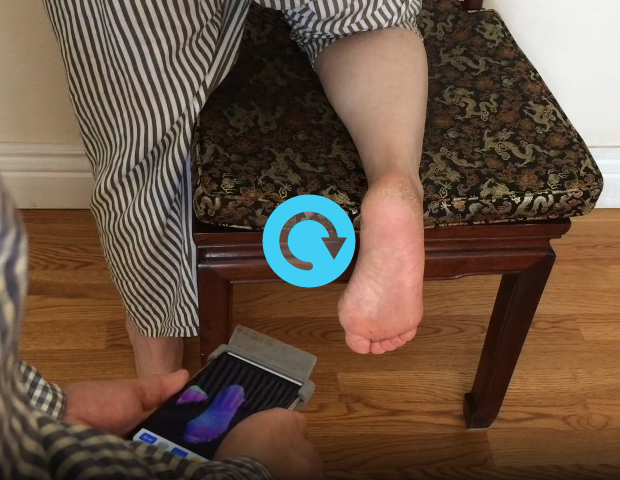
What you have learnt in Tutorial #1 can be used in this tutorial. But remember, you are using the iPhone or iPad up-side-down in this tutorial. Please pay special attention to this critical step: When you align the iPhone or iPad with the foot, try to make them as parallel as possible when you shout 'Scanner Go' at the starting time. After that moment, you can move the iPhone or iPad around the foot, especially around the heel and the iPhone or iPad does not need to be parallel to the foot. The following figure illustrates the point we try to make. When you do that, the 3D image is properly angled. If you start the scan with a large angle, that angle will be brought in the final image, which is not preferred in the image processing stage. It is true that it is easier for the operator if the foot is plantar-flexed a little (the two red lines).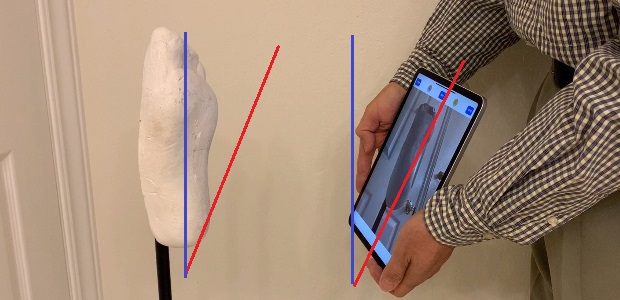
Align the iPhone or iPad with the foot as parallel as possible when starting
Tutorial #1C: Working Procesures in AOMS TOT jr
Setup: Use the AOMS TOT jr app with or without mirror attachment.Purpose: This tutorial is to show you how normal working procedures look like.

Video clip of AOMS TOT jr Tutorial #1C. Click on the image to play video
Notes on Tutorial #1C:
This tutorial is to show you how normal working procedures look like.Tutorial #2: Wearable mode of AOMS TOT jr
Setup: Use the waist belt attachment mentioned in the introductory page, besides the AOMS TOT jr app installed in your iPhone XR to scan patient’s foot.Purpose: With the belt attachment setup, this tutorial is designed for the user to take scans with two hands handling the foot, while using voice commands to control the scanning process, and do some waist maneuvering aiming at the plantar surface of the foot. In this mode, ‘neutral position’ scanning is made possible.
Video clip of AOMS TOT jr Tutorial #2. Click on the image to play video
Notes on Tutorial #2:
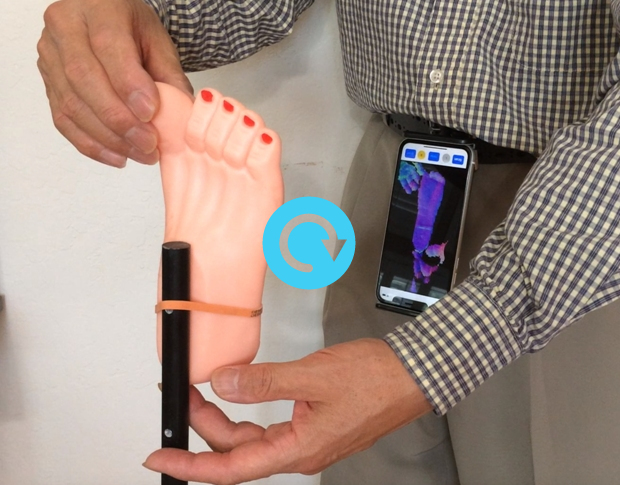
What you have learnt in Tutorial #1 can be applied to this tutorial. It is a little hard to describe how to use waist to control the scanning angles though. For this innovative wearable scanning mode, we could not think of any comparables. It requires you keep your arms stable, while maneuvering your waist to do some ‘hokey pokey’ to let the iPhone scan around the plantar surface of the foot. Make some trials and let us know your ideas.Tutorial #3: Hand-held mode of AOMS TOT jr – supine position
Setup: Use the mirror attachment mentioned in the introductory page, besides the AOMS TOT jr app installed in your iPhone XR to scan patient’s foot in supine position.Purpose: With the mirror attachment setup, this tutorial is designed for the user to take scans with your two hands operating on the iPhone, while using voice commands to control the scanning process. In this supine-position mode, patient leg needs to be supported by a stand, or the patient needs to lie down on doctor’s high bed or chair.
Video clip of AOMS TOT jr Tutorial #3. Click on the image to play video
Notes on Tutorial #3:
What you have learnt in Tutorial #1 can be used in this tutorial.Tutorial #4: Hand-held mode of AOMS TOT jr – prone position
Setup: Use the mirror attachment mentioned in the introductory page, besides the AOMS TOT jr app installed in your iPhone XR to scan patient’s foot in prone position.Purpose: With the mirror attachment setup, this tutorial is designed for the user to take scans with your two hands operating on the iPhone, while using voice commands to control the scanning process. In this prone-position mode, patient leg needs to knee down on a chair.
Video clip of AOMS TOT jr Tutorial #4. Click on the image to play video
Notes on Tutorial #4:
What you have learnt in Tutorial #1 can be used in this tutorial.Tutorial #5: Innovative way of scanning foot casts using AOMS TOT jr
Setup: Use the AOMS TOT jr app without the mirror attachment. Set the iPhone or iPad on desktop and make your two hands free.Purpose: With two hands free, this tutorial is designed for the user to take scans of the plaster casts or foam impression boxes. You will use voice to control the scanning process.
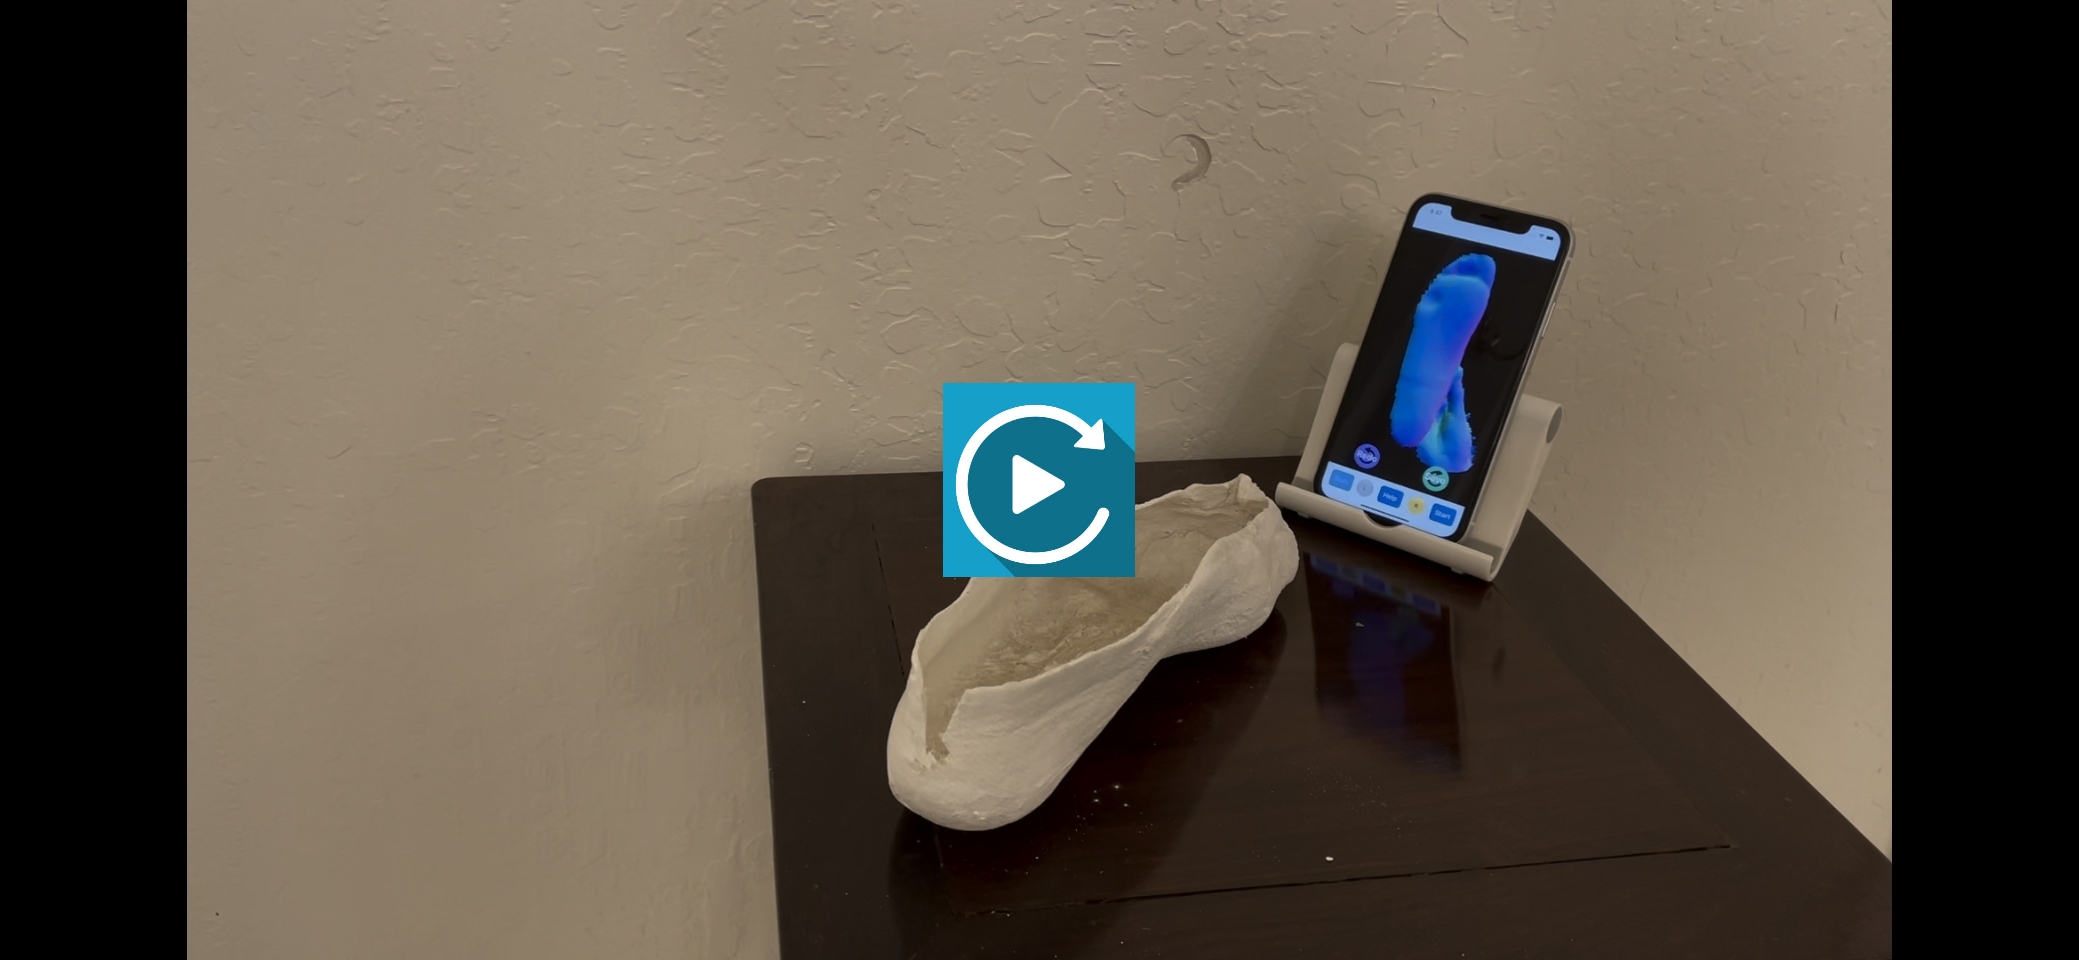
Video clip of AOMS TOT jr Tutorial #5. Click on the image to play video
Notes on Tutorial #5:
An innovative way of scanning foot casts with the AOMS TOT jr.Tutorial #6: File handling in AOMS TOT jr
Setup: Use the AOMS TOT jr app with or without the mirror attachment.Purpose: Learn how to manage the files in AOMS TOT jr.
Video clip of AOMS TOT jr Tutorial #6. Click on the image to play video
Notes on Tutorial #6:
Learn how to manage the files in AOMS TOT jr.Tutorial #7: Naming conventions used in AOMS TOT jr
Setup: Use the AOMS TOT jr app with or without the mirror attachment.Purpose: Learn to understand and use the file names in AOMS TOT jr.

Video clip of AOMS TOT jr Tutorial #7. Click on the image to play video
Notes on Tutorial #7:
Learn to understand and use the file names in AOMS TOT jr.Special notes:
• You do not have to use voice. If for any reason, you do not want to use voice, you can use the buttons shown on screen. After you have tapped ‘Start’, you can tap ‘Scan’ to activate the scanning. In this case, you cannot stop the scanning by voice, and you have to wait until the maximum number of frames is reached. The number can be set in the settings.• After you have scanned both feet, you cannot send one at a time. If you send one, the other one will be lost. If you really want to scan one and send one, you have to do it with ‘scan one and send one’ separately.
• The scanning process is flexible. Let’s assume you have done both feet, but for any reason, you want to redo the left foot. You can tap the ‘Start’ button and make sure you choose ‘Same Order’. Then choose left foot.
• After one or both feet have been scanned, if you ever want to redo the order from fresh, you can tap the ‘Start’ button and make sure you choose ‘New Order’.
• An important thing you might not have realized. When you use the mirror attachment, the image will be flipped, i.e. left becomes right and right becomes left. The app relies on your input to make correct judgment. So when you are prompted to enter either ‘L’ or ‘R’, please double check whether left foot or right foot is being scanned.
• “Practice will make you perfect”, so keep practicing until you feel good enough.
If you need anything, Contact Us.
Updated on March 26, 2024. More information will be added. Please send us your feedback.
Company website:
www.sharpshape.com
Copyright (C), Sharp Shape 2011
All rights, including photographic, polygraphic, and materials are reserved.
AOMS® is a registered trademark of Sharp Shape.
Sharp ShapeSM is a registered service mark of Sharp Shape.